My Disney Frozen Sisters Mini Quilt
Afraid that I made this quilt up as I went along... First one of this kind that I ever made up. It is a pannel quilt... It is only my 3rd quilt. All 3 were made up within the past 5 years... With about 60 years of sewing under my belt, I just used common sense when working on all of them.

Actually, with the first two, used my Brother SE350 as shown below with my first one, the Strawberry Cake quilt. I used the design on the back for making straight line sewing on the whole quilt, not like the Disney Frozen Sisters mini quilt, with changing directions, etc. The second quilt had the same backing as the first one, but, in yellow, and done up the same way as the first one.

 Did not take any photos until I was ready to put the side bindings on the Disney mini quilt, so, winging it in trying to illustrate the different steps when making up this third quilt, the Frozen Sisters mini quilt. Not like when I made up the other two...
 1) First of all, I laid the 3 layers together, the top fancy printed layer, the batting and the bottom solid pink layer. Was about a yard of fabric for the top, bottom, and the batting. I used the WARM & NATURAL CRAFT SIZE BATTING FOR INFANT QUILTS, ETC... Left the overhang on the batting at this point....Smoothed the 3 layers out on the top of my bed, similarly the way that this completed photo on top of my pink and white quilt was laid out.

2) Put the green clips, the Jumbo Wonder Clips by Clover Mfg Co., around the edge of the quilt. These Jumbo Wonder Clips remind me of the silver metal hair clips from years past that when doing up spit curles and waves in ones hair that are still in use... My pack of them contain 24 pieces. They worked great for holding the 3 layers of fabric together until I removed them...

3) I put the walking foot on my sewing machine. Then, off to start sewing. I used number 4 for large stitches, with a number 14 needle in my sewing machine. Working from the top layer all through the 3 layers, I outlined the one inch cranberry inner frame. I had gray thread I used on the top inner part with pink thread in the bobbin.

4) I removed the green clips after outlining the cranberry section, before starting the inside center section. They did their job of holding the 3 layers together, in place. When adding the lighter pink border to the edging, I again used those green clips that are made spicifically for sewing, and not for hair clips...LOL. It was easier working with them rather than using straight pins or using safety pins to hold everything together, the layers of fabric that is, and not putting holes in the fabric when doing so...

5) I quilted inside section starting at the top of the design, going back and forth and doing U TURNS at the end of each row inside the the cranberry square, which you can see better on the pink back because the pink thread is deeper in color than the pink fabric.When doing the U turns, I went down ten stitches and turned to start the long rows across the mini quilt. My rows are not perfect. Some are thicker than the others. Really give it the home made look, that is for sure.

6) I stopped half way down from the top when making the quilted rows. Then, I turned the quilt completely all the way around and placed the quilt at the bottom area of the inner printed square.

8) Next was the outer pink border. I trimmed the excess inch from around the outer 4 sections. I changed the gray thread to pink thread for the top of the mini quilt. I made the rows a little bit wider than the width of the walking foot. I started at one corner and ended at the same corner, going all the way around. Doesn't make which corner you start at. Just randomly pick one to start at... The next row I started and ended at another different corner. There are 4 corners so I started and ended at another corner, the 3rd corner. Did same on the 4th corner. I started the 5th row going around at the same corner I started row 1 at. This row was the last rown and very, very closed to the edge of the quilt....

9) Next was the binding. I used four 5 inch wide strips that I had folded in half. All of the strips were 44 inches long. Had to cut down the top and bottom sections somewhat.Again, turning in the raw edges, same as I did on the sides. I turned in the edges so I did not have raw edges at the ends. Did both sides that way.

10) Next, I did the top and bottom edges the same way..
.

NOTE: Attempted to use the clear nylon thread, but, ran into a problem when filling up the bobbin. It knocked the bobbin out of shape... Honestly, it really did that... I guess that is why I heard that others have wound the clear nylon thread by hand and not by using the machine, as I did.. Always a first time for everything... Because I was racing the clock, I didn't bother rewinding the bobbin by hand... I just used gray thread on the inner top section, which doesn't show up too bad on this fabric design.


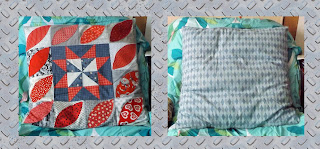
Showing the bottom and the top of the mini quilt, which is laying on top of another pink quilt, a deeper shade of pink, on the single bed.
Might try free-hand quilting on the next quilt I make. Will have to drop the feed dogs to do that. Been watching some instructional videos to learn how to do same, including the ones by Nancy Zieman who has the "Sewing With Nancy" on the Wisconsin Public Television Station... www.sewingwithnancy.com/videos
Showing the finished mini quilt by laying it on the couch
Actually, with the first two, used my Brother SE350 as shown below with my first one, the Strawberry Cake quilt. I used the design on the back for making straight line sewing on the whole quilt, not like the Disney Frozen Sisters mini quilt, with changing directions, etc. The second quilt had the same backing as the first one, but, in yellow, and done up the same way as the first one.
See both of them on my other (older) blog,
Here, the Disney Frozen mini quilt is laying on top of another pink quilt, on top of a single bed. Purchased the cotton pannel for making up this mini quilt on eBay. The fabric for the backing came from our local Walmart Department store's fabric department. The batting came from a local JoAnn's Craft store.
2) Put the green clips, the Jumbo Wonder Clips by Clover Mfg Co., around the edge of the quilt. These Jumbo Wonder Clips remind me of the silver metal hair clips from years past that when doing up spit curles and waves in ones hair that are still in use... My pack of them contain 24 pieces. They worked great for holding the 3 layers of fabric together until I removed them...
3) I put the walking foot on my sewing machine. Then, off to start sewing. I used number 4 for large stitches, with a number 14 needle in my sewing machine. Working from the top layer all through the 3 layers, I outlined the one inch cranberry inner frame. I had gray thread I used on the top inner part with pink thread in the bobbin.
4) I removed the green clips after outlining the cranberry section, before starting the inside center section. They did their job of holding the 3 layers together, in place. When adding the lighter pink border to the edging, I again used those green clips that are made spicifically for sewing, and not for hair clips...LOL. It was easier working with them rather than using straight pins or using safety pins to hold everything together, the layers of fabric that is, and not putting holes in the fabric when doing so...
5) I quilted inside section starting at the top of the design, going back and forth and doing U TURNS at the end of each row inside the the cranberry square, which you can see better on the pink back because the pink thread is deeper in color than the pink fabric.When doing the U turns, I went down ten stitches and turned to start the long rows across the mini quilt. My rows are not perfect. Some are thicker than the others. Really give it the home made look, that is for sure.
7) Here, at the bottom section I worked my way upwards to the center to meet where I ended the row when working from the top down. I had read about doing that over at Pattern Review in the quilting section awhile back about doing it this way when working with long arms and the like.
8) Next was the outer pink border. I trimmed the excess inch from around the outer 4 sections. I changed the gray thread to pink thread for the top of the mini quilt. I made the rows a little bit wider than the width of the walking foot. I started at one corner and ended at the same corner, going all the way around. Doesn't make which corner you start at. Just randomly pick one to start at... The next row I started and ended at another different corner. There are 4 corners so I started and ended at another corner, the 3rd corner. Did same on the 4th corner. I started the 5th row going around at the same corner I started row 1 at. This row was the last rown and very, very closed to the edge of the quilt....
10) Next, I did the top and bottom edges the same way..
.
NOTE: Attempted to use the clear nylon thread, but, ran into a problem when filling up the bobbin. It knocked the bobbin out of shape... Honestly, it really did that... I guess that is why I heard that others have wound the clear nylon thread by hand and not by using the machine, as I did.. Always a first time for everything... Because I was racing the clock, I didn't bother rewinding the bobbin by hand... I just used gray thread on the inner top section, which doesn't show up too bad on this fabric design.
Showing the bottom and the top of the mini quilt, which is laying on top of another pink quilt, a deeper shade of pink, on the single bed.
Might try free-hand quilting on the next quilt I make. Will have to drop the feed dogs to do that. Been watching some instructional videos to learn how to do same, including the ones by Nancy Zieman who has the "Sewing With Nancy" on the Wisconsin Public Television Station... www.sewingwithnancy.com/videos


Comments
Post a Comment